Live Vibe: Blended Soups!
This simple elegant "soup" may become your favorite way to celebrate fennel!
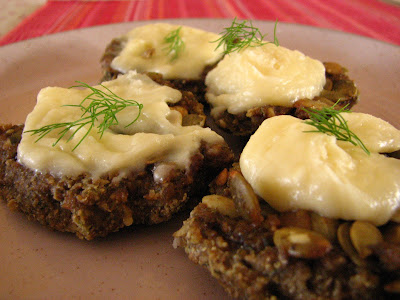
Cool Fennel, Honey, Coconut Soup with Fennel Sun-Breads
 Do not try this with a normal blender. You will need a high-powered Vitamix or other work-horse industrial machine of choice.
 In addition to romantic, beautiful and unique, this simple elegant soup is great medicine! Anti-inflammatory, anti-microbial and isotonic, it is a great choice for combating flu symptoms or recovery from surgery or injury resulting in bruising or inflammation.
Start with frozen coconut mylk (The frostier the coconut mylk, the more refreshing the soup becomes. I like it sorbet-like-consistency so I can eat it with a spoon! Jamie likes his drinkable right out of the glass! (Let the coconut mylk defrost a bit or run the Vitamix longer for soupier soup)
Organic Ingredients:
- Frozen organic coconut mylk*
- 3 small or one large frond and bulb of organic fennel
- 1/4 cup raw organic honey
Place all three ingredients in the Vitamix and let it run until smooth but still cool. Pour into goblets or soup bowels. Serve immediately. No need to worry about left-overs. There won't be any!
Optional Garnish: fresh ground nutmeg and coriander seed.
Variations: Use 1/2 the amount of fennel and add a frozen persimmon or ripe pear for a cool fruit soup. Serve with coconut crackers. (See: "What's in the Dehydrator at Val's")
*Buy frozen bags of coconut mylk or pour a can of organic coconut mylk into a zip-lock bag and freeze flat on a tray, so that it can be easily broke into pieces.
Below is a recipe for sun-breads I adapted from Katrina Blair's Savory Pumpkin Seed Bread. Check out her stuff at www.turtlelakerefuge.org. She is an inspiration!
Live Vibe: Sun Bread!
Organic Ingredients:
- 2 cups of sprouted buckwheat grouts
- 2 cups of sprouted pumpkin (or sunflower) seeds
- 1 tsp living sea salt
- 1/2 a large onion (or 1 cup of cubed zucchini or pumpkin flesh or shredded carrot)
- one 4-inch piece of hand-harvested sea vegetable of choice (I used Kombu)
- 1/2 to 1 cup of clover honey, to taste
- 1/2 organic onion
- Freshly harvested herb of choice: I used fennel for this one
- Natural sparkling water (for bread making only, not for seed sprouting)*
- Raw organic sunflower or walnut oil
- Have organic psyhilym husk powder, powdered oat grouts or rolled oats** on hand for thickening, if needed.
* Gourmet tip: You can do this with clean source water that is not sparkling. However, I have discovered that the carbonation gives the "bread" a nice yeasty-soda flavor and a pull-apart-bread-texture not obtained with flat water.
**Allergen alert: Be aware, oats are not glutton free.
Instructions:
1. Soak and sprout sunflower seeds and grouts separately, 1 to 3 days.
(If you have a method you like, do it.)
Here's my method: Soak covered with clean source water overnight or sometimes a full 24 hours. I change the water half-way through. After that, rinse and drain twice daily, returning wet seeds and grouts to a clean bowel, covered until plump. the seeds may split open and develop "tails". That's good! Treat them gently. (Both grouts and seeds can be refrigerated to slow the process if needed.) On the final day, I add the sea veggie and extra water. I also expose the grouts and seeds to indirect sunlight on the final day before making bread.
2. Rinse and drain the seeds and sprouts one last time. They should be wet, but not watery, when you pulse them.
3. Optional: Take out 1/2 cup of seeds for garnish. Place in a jar with Nama Shoyu or Raw Tamarind Paste. Shake it. Let rest.
4. Place all the ingredients including the sea veggie (now plump and wiggly-fun from soaking) into the food processor. Pulse, then grind into a paste.
5. Add sparkling water and oil at the end while the mix is turning. Consistency can be mold-able bread-dough-like substance or a batter. It works either way.
More liquid = thin "slices" of bread or pliable "wraps."
Less liquid =dense, moldable, sticky dough = loaves with chewy centers.
6. Adjust thickness by adding in small amounts of powdered oat grouts or rolled oats or psyhilym husk powder, only if needed.
7. Adjust seasoning. Note: Dehydrating will intensify flavors, so be spare with the salt! Add more honey and some mustard, if it strikes you!
8. Pour batter (or use wet hands to form loaves) on dehydrator sheets. (In the summer, I put these outside under screens. This works great too! My lovely friend, Gretchen, in !Costa Rica! can sun her breads in December! Go for it! Report back, please. )
9. For garnish: Press reserved seeds into the top of loaves or sprinkle them onto your batter. You can also use sprigs of fresh herbs, soaked fruits (raisins, yum!) or sprouted grains and nuts of your choosing.
10. Dehydrate at 105 degrees to desired "doneness." (I like loaves with chewy middles and firm but not crunchy on the outside. For thinner breads, I like pliable "wraps." Make both types from one batch by adding more water to remaining batter once you have formed enough loaves to satisfy.)
11. Flip once. Dehydrate the bottoms just long enough to oxidize a "crust." You will see what I mean.
12. Let cool to room temp. Store loosely in brown paper or paper-lined plastic bags in the fridge. Also keep indefinitely, frozen. Thaw in dehydrator as needed.
13. Eat plain or fancy. Make wraps, spread with honey "butter." This is a living food made of seeds. It combines with starches or proteins, oils or herbs and with all veggies. Yummier than you might think!
Live Sun-Bread Workshops!
Call to arrange a sun-bread workshop for you and your friends.
A one-hour workshop in you home for 10 people or more is $18 each
(A minimum of 5 people is $35 each.)
Includes: a big salad, bread & cracker-tastings and spreads.
(You keep the bread we make in your dehydrator!)
Makes a great lunch program!
OR
Attend a Demo & Dine on a Wednesday evening. I will demo bread and cracker making after the meal portion of the evening. We will eat the bread at Thurday eve's class. You can come to both sessions for a free-will love offering, sliding scale $10 to $25. You will learn everything you need to know to get you started in one class!
For more information call:
Val at 816-364-6922


No comments:
Post a Comment